|
|
Hi ExplorOz Reader
This newsletter is specifically for Traveller app users.
Since there's been a number of updates lately
we thought it would be useful to do a spotlight on the new features.
If you've been a regular app user
for some time, take note that with these changes you can now do everything inapp
and offline (other than data syncing).
The updated User Manual (as at 21st September) is your go-to however this
newsletter covers the changes in detail together with new graphics.
We'd also like to take this opportunity to thank all our customers for helping us achieve such high app store ratings and for the
positive reputation we've gained especially in the recent year. Our phones and help channels are flooded with people that tell us you've referred them and that is such good news.
We don't have teams of staff or large budgets to put into R&D or advertising and the
ongoing lockdowns and border restrictions have greatly impacted our business so your word of mouth, social media, and app store reviews
are very important to us. Please keep it coming! Thanks from David & Michelle Martin

|
DIRECT FILE IMPORT
|
|
You can now import files from other sources directly to the Traveller app on your preferred device.
There is no
longer any requirement to upload the file to the website first.
This enables you to add files when you are offline that you can immediately use as Track Logs &/or
Places. It also simplifies the process of adding Places & Track Logs as you no longer have to add
them separately.
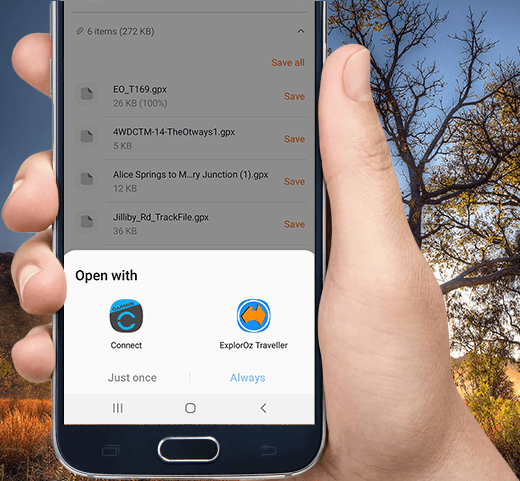
There are 2 different ways to do it:-
The most common method is to select the file you want to use
(eg. from an email attachment, or downloads folder). When you select the file, your device will
prompt you to select a program to open
it with - just select ExplorOz Traveller. Supported file types are GPX, KML, and TCX.
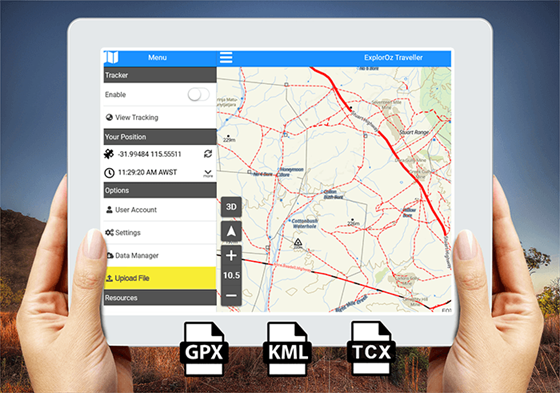
If you have problems with this method, or prefer to do it another way,
you can import the files from within the app as shown in the image below.
Open Menu - select Upload File and then browse for the file.
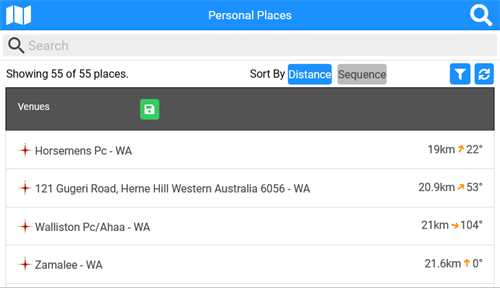
 Which ever way you choose to select the file you'll then come to the Import Screen offers which looks
like the image below.
Here you'll see quite a few options to review the data you've selected prior to finalising the import.
If multiple days or multiple
trips are detected in the Track Log file it will display multiple Line Segments - tap the Eye icon to
view these. You can then ignore or select the segments to include.
Which ever way you choose to select the file you'll then come to the Import Screen offers which looks
like the image below.
Here you'll see quite a few options to review the data you've selected prior to finalising the import.
If multiple days or multiple
trips are detected in the Track Log file it will display multiple Line Segments - tap the Eye icon to
view these. You can then ignore or select the segments to include.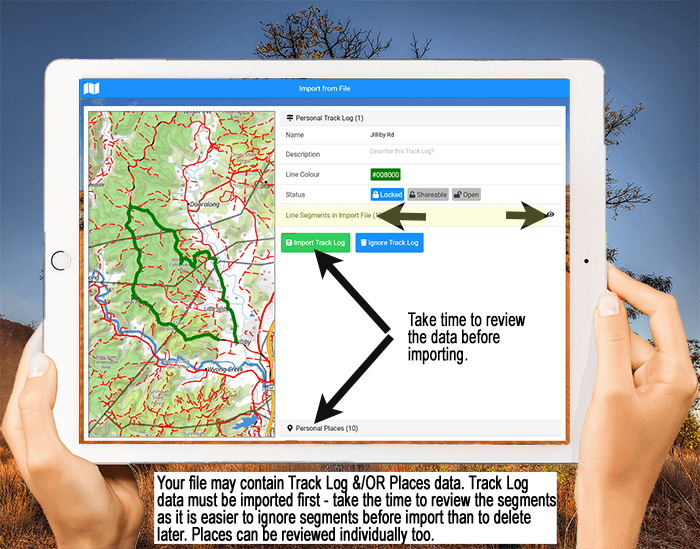 If there is waypoint data in your file import, you won't be able to review them until you accept the
Track Log import.
You'll then be able to tap the Personal Places heading to review each one. We recommend you are very
selective
when importing Places and encourage you to refer to the User Manual for practical tips re: "Management
of Personal Places".
If there is waypoint data in your file import, you won't be able to review them until you accept the
Track Log import.
You'll then be able to tap the Personal Places heading to review each one. We recommend you are very
selective
when importing Places and encourage you to refer to the User Manual for practical tips re: "Management
of Personal Places". |
PERSONAL PLACE GROUPS
| |
Batch deleting Places is only possible if the Places are in the same Group so when you create Places - make
sure you assign them to a Group
incase you need to delete them later - otherwise you'll have to do it one by one.
One of the new features we've recently added is the ability to delete Place Groups inapp, and also the
ability to change the name of a Personal Place Group.
Simply tap into the existing name
and the keyboard on your touchscreen will appear so you can edit the name. Once you've made a change, a
green
SAVE icon will appear. Tap the green save icon to keep your changes.
To delete an entire Place Group swipe left on the heading row to reveal the delete button as pictured
below:- 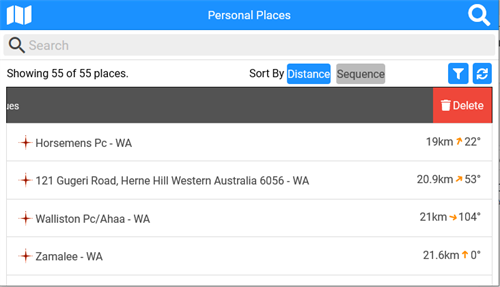
|
PHOTO MANAGEMENT
|
|
Photo upload and syncing is now more obvious and photos that you've uploaded (Places or Track Logs) can now be deleted
directly in-app as required. Did you know you can add photos even when you are offline?
The app will simply store the image to the selected location and perform the update when you are next online.
To delete photos, select SHOW to open the Place or open the Track Log and then tap on the photo. A RED bin icon is shown
in the bottom
right corner of each photo. Tap this once and the icon changes to orange - tap again to confirm. If you don't tap the
orange icon the photo will not be deleted.
|
CO-ORDINATES AT CROSS HAIRS
|
The Cross hairs appear in the centre of the map when its not showing your current
location.
In this new update, you'll now see the coordinate of the position at the cross hairs
displayed at the top of the map screen.
There are a couple of things to note:-
- You can also type any coordinate into this panel in your chosen format and this
will reveal a GO option -
the map will move to display that location in the cross hairs/centre.
- You can copy/paste coordinates to here or from here.
- You can change where the coordinates appear on the screen - by default its at
the top, but go into Settings to change to bottom, or even above/below the
crosshairs
- As always, you can create a new Place at the cross hairs using the Pin, and you
can change the format (Settings).
|
NEED MORE HELP?
|
OPERATING TIPS & TROUBLESHOOTING
In the recent September revision of the User Manual we completely changed the Table of Contents
to simplify terminology in headings to make it easier for newcomers to find what they're
after from the Index page.
We also added a whole new section to the end called "Operating Tips & Troubleshooting".
This section contains the most common queries that come through the Help Desk on a
regular occurance so please look here first.
VIDEO TUTORIALS
We've added a few more videos which are now embeded into
the Traveller webpage.
COMMUNITY HELP
Our Facebook group ExplorOz
Traveller
Community
is also an excellent way to get prompt assistance from other app users. If you prefer ask in the
ExplorOz Forum on the website, that's ok too.
|
|
This email was sent from ExplorOz.com
I.T. Beyond Pty Ltd. Perth, WA, AUSTRALIA
|
|
|